Have you ever wondered how all those butterflies in the museum were preserved? Or have you found an insect that you wished to humanely kill and place into your own collection? Here I will describe the basic techniques for capturing and preserving insect specimens.
First, the Lepidopterists' Society has compiled a
statement on collecting, which is a very good guideline to follow. In general, a person should only collect for purposes of education and scientific study, and should show consideration in sensitive habitats and areas with small insect populations, so that an area does not become over-collected. Please review this statement if you are considering doing some collecting of your own.
Capturing insects
Most insects (including butterflies and moths) can be captured using a butterfly net.
Other methods of capturing insects include pitfall traps (ground-dwelling insects), light traps (night-flying insects), and sticky traps (scent-attracted insects such as flies).
Dispatching insects for specimens
The original method of killing (dispatching) insects is to use a "killing jar", a glass jar with an airtight lid and a layer of plaster in the bottom soaked with a chemical such as ethyl acetate. However, these usually need to be regularly "recharged" with the chemical, which is also harmful to people if accidentally inhaled or mishandled, and butterflies may damage their wings from flying in the jar before they succumb to the chemical. I prefer to place butterflies in glassine envelopes, which keeps their wings folded and unable to move, and allows me to easily transport them. I then place them (still in the envelopes) into a freezer for several minutes, or longer if I do not plan to mount them for my collection right away. While in the field, I keep the envelopes with butterflies in plastic container inside a cooler. Killing jars are generally more appropriate for moth collecting, since moths are more difficult to handle with forceps without losing a lot of scales trying to get them in the right position to put in an envelope, their larger bodies create more space in the envelope for their wings to move, and they are adapted to cooler temperatures so do not slow down as quickly as butterflies when placed in a cooler or freezer.
Mounting insects for a collection
To preserve most insects for a collection, they must be dried. This involves inserting a pin through the thorax (middle segment of the body), and adjusting the wings and legs as desired. There are several methods of mounting butterflies and moths; some use wood spreading boards while others use foam, some hold the wings in place by pinning through the wing, while others use paper strips to hold down the wings during drying, and the process of placing the wings can vary greatly. The following instructions are how I spread and preserve Lepidoptera. I recommend trying different methods to find the one that suits you best, and experimenting with different ways of moving the wings into place. If you are left-handed, you might simply use a mirror-image of these photos and instructions, or you might wish to develop other methods of placing the wings.
Materials
Before you start, make sure you have all the supplies you need and lay them out on a table or other work surface where you can easily reach everything. You don't want to find yourself in a situation where you are holding a wing in just the right position and realize you forgot to put your pins within reach!
All of the supplies mentioned and shown below were obtained from BioQuip, a company in California that closed their doors in early 2022 after over 70 years selling just about everything a lepidopterist could ever need or want. I've removed all the links to their site that used to be on this page, but instead of relinking them to specific items that may change over time, please refer to the
Collecting & Rearing Supplies page where I have listed a number of supply options to choose from.
 |
| Great Spangled Fritillary with its envelope. |
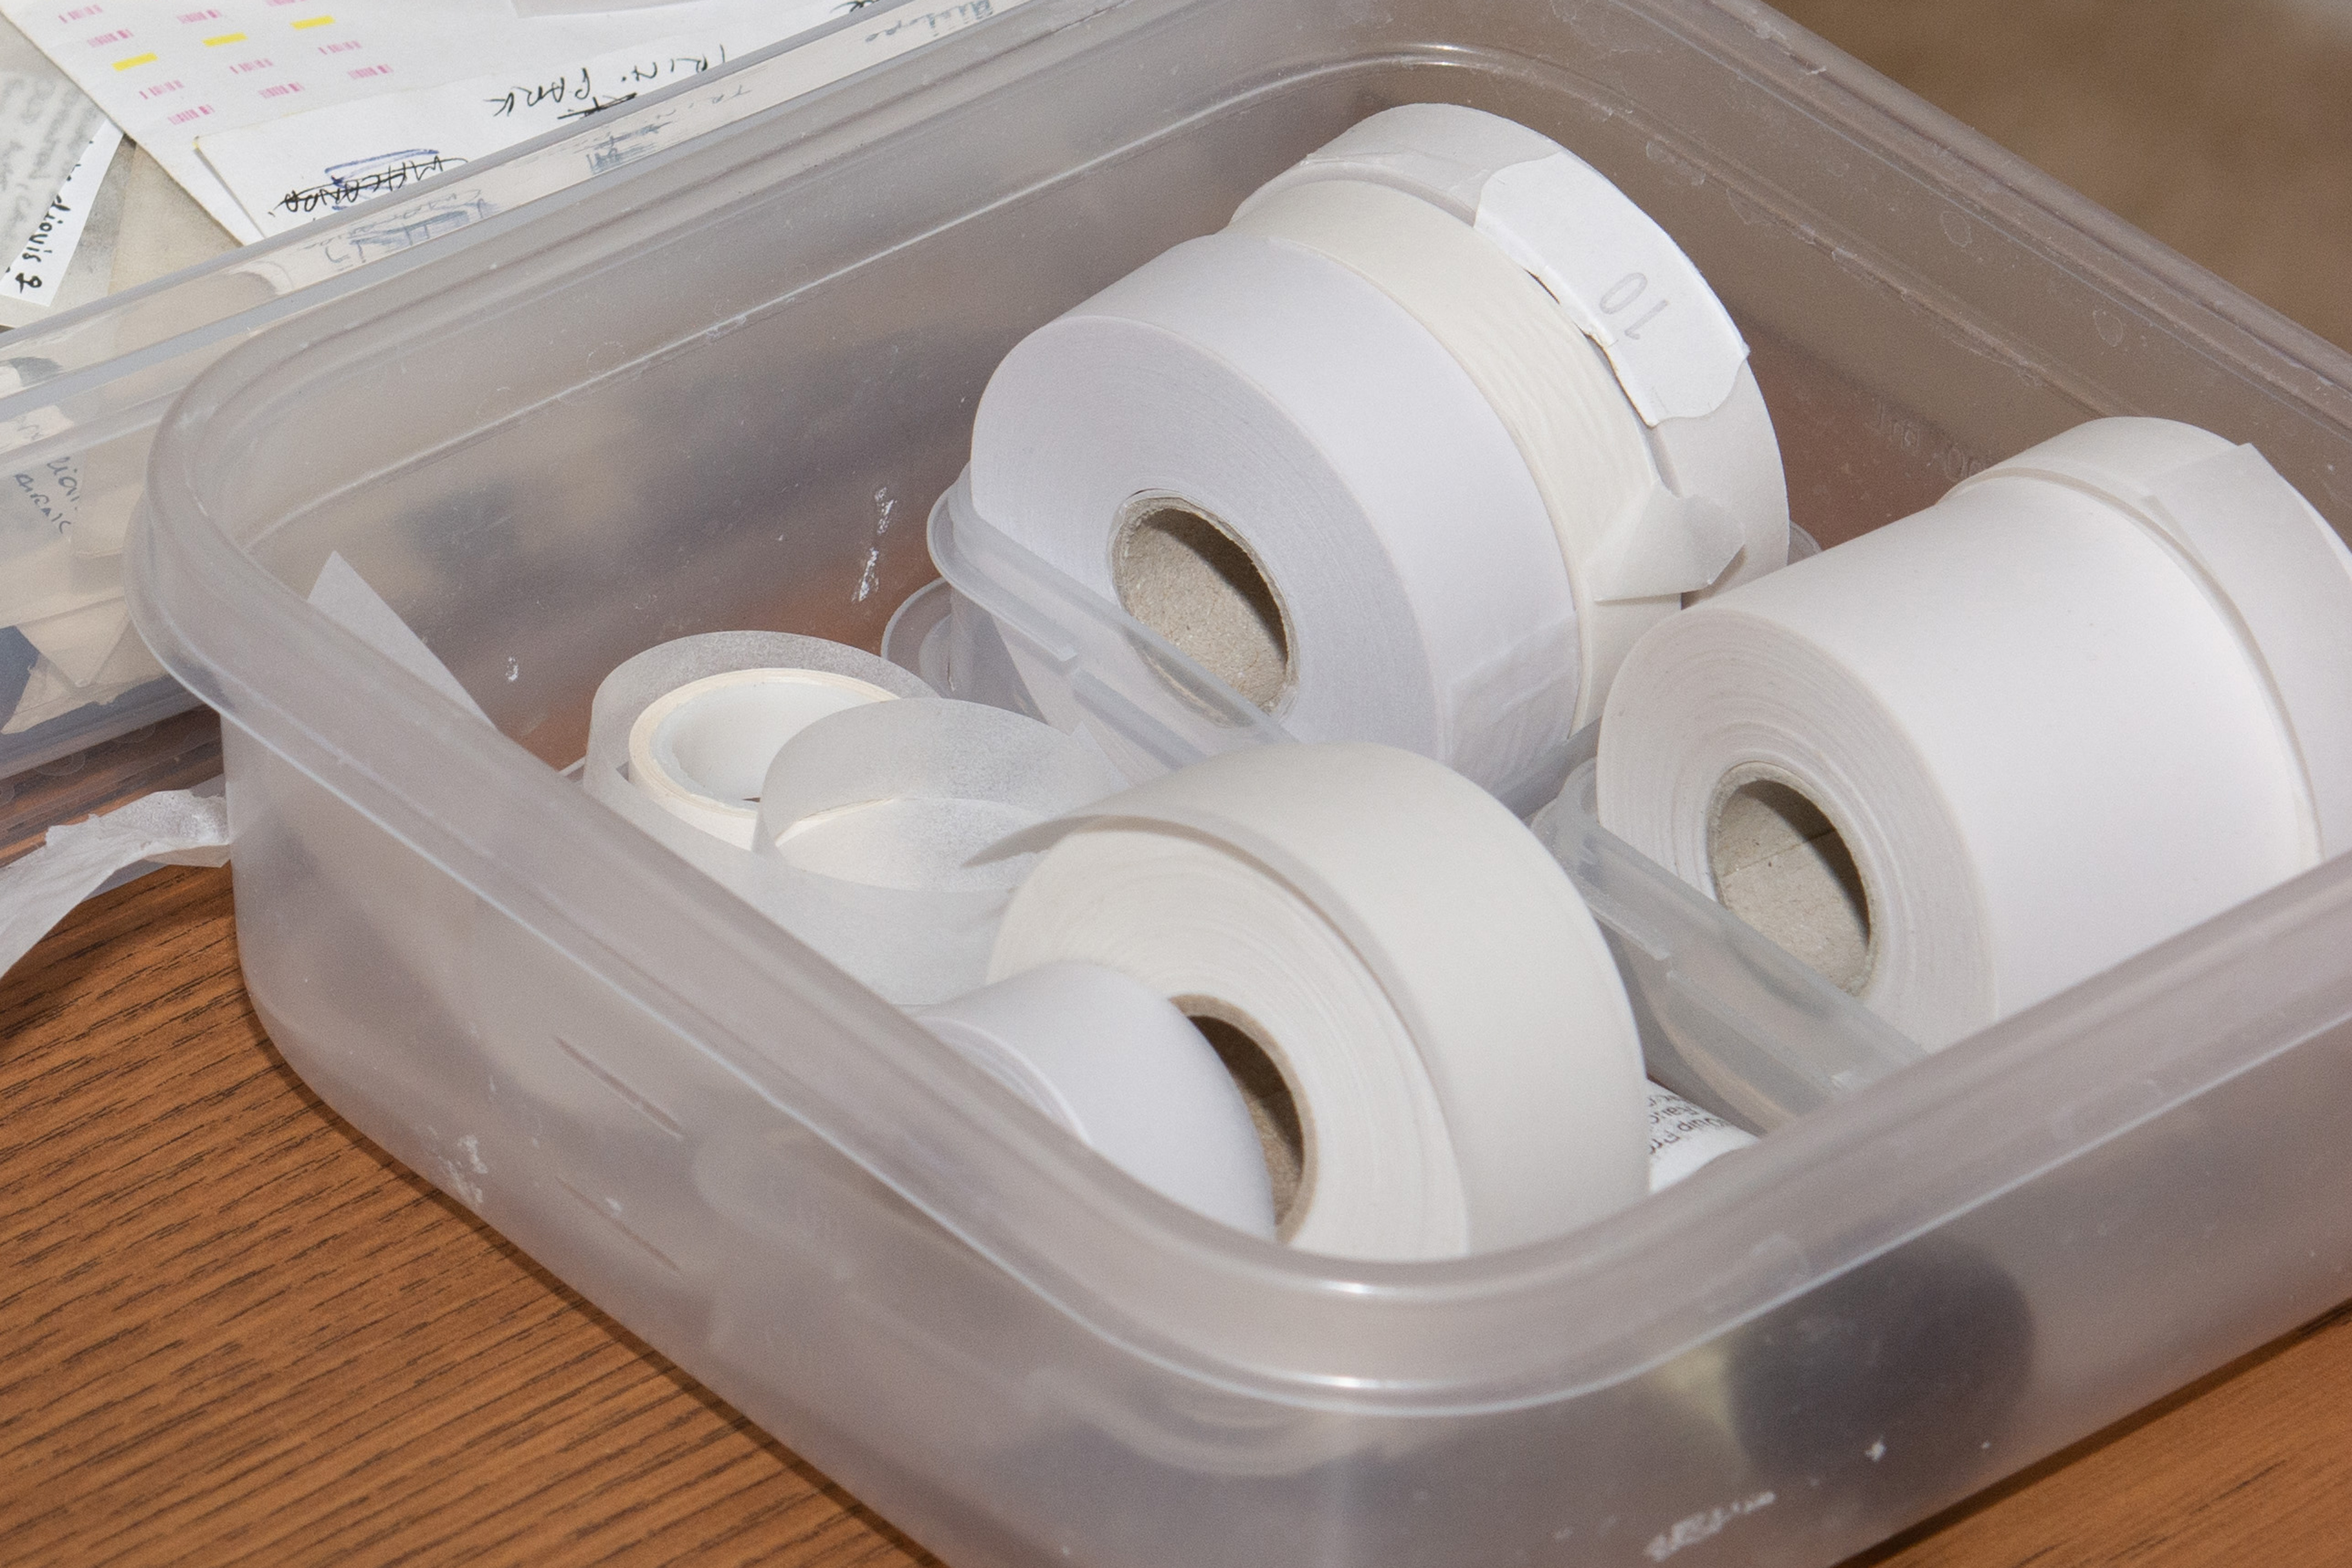
Glassine envelopes - I always carry these when I am collecting, and almost always have some spares tucked away in my car and purse for those occasions when I come across something new in a place I didn't plan on collecting in. Lepidoptera can be stored in these envelopes for years. They can be kept in air-tight plastic containers until you are ready to spread the specimen (an air-tight container is essential for keeping other bugs such as dermestid beetles from destroying the specimens). Whenever I collect specimens, I keep all the envelopes from one trip together in ziploc bag placed inside a hard container. The location details (GPS coordinates and other details) are written in my field notebook. I either match up the date and location name or number on the envelope with the entry in my notebook, or I write the details on a scrap of paper placed in the bag with the envelopes. Each envelope either has the site number ("stop 1", "stop 9", etc.) or other short notes such as if I photographed the butterfly before collecting it. The smallest envelope size (Size 1) fits the majority of butterfly species found in the Pacific Northwest. The next size up (Size 2) fits the larger species such as swallowtails, while Size 4 1/2 is commonly used to fit the largest butterflies and moths, like Two-tailed Tigers and Saturniidae. I typically write site data on a Size 2 envelope and place all the Size 1 envelopes into it so I don't have to write on every envelope and can reuse the small envelopes multiple times.
Labeling pens (Sigma Micron brand, India ink) - fine-point pens for writing specimen labels, and are almost the only thing that will clearly write on glassine paper without significant smearing. Always carry at least one with the envelopes so you can record the location and any other information onto the envelope, so the information doesn't get lost or forgotten.
Spade-tip forceps - an absolute must for handling butterflies and moths, either dead or alive. I keep at least three on hand. Any forceps you use must be completely smooth to reduce loss of scales, and a rounded or spade tip, rather than a sharper tip, reduces the chance of damaging wings and other body parts.
Insect pins - I use Size 1 for most specimens, Size 2 for swallowtails, large Nymphalids, and larger beetles, and Size 3 or 4 for large moths (Sphingidae and Saturniidae) and very large beetles (beefy scarabs, etc.). I only use Sizes 00 or 0 for the tiniest Lycaenids, or in the case of Pygmy Blues I might do a double mount: pinning the specimen with a minuten (super tiny ~half inch long pins usually used for micro moths), which is pinned into one end of a small rectangle of foam, the other end pinned onto a normal insect pin, usually Size 1 or 2. This keeps the main pin stable and prevents accidental breakage of the specimen from bending a 000 pin (something I'm really good at doing...).
Glass-headed pins (also found at sewing shops) - use to hold paper strips in place on spreading board, and for adjusting and holding legs and antennae in place. Insect pins can be used as well but are less secure. Glass-headed pins are easier to grasp, and are shorter with a larger diameter than insect pins, making them more sturdy.
Pinning board - I use the blue ones BioQuip made, but there are other styles, depends on personal preference (see
this blog post about BioQuip's foam spreading board styles). Wood boards are angled, which helps counteract the "drooping" effect of some specimens slightly relaxing downward after removing from spreading boards, even when thoroughly dried. The downside of wood boards is that it can be difficult to get pins to stick securely when holding the wings in place.
 |
| Glassine paper strips for holding down wings. |
Glassine pinning strips - I've found the smallest size is the most useful (see photo), although larger widths can be cut down to any size desired. You can also buy a stack of glassine paper and cut it into strips yourself.
Curator's block - holds pins and forceps. These can be handy to keep pins organized by size and readily accessible.
Repair adhesive - great to have on hand. I have not found a replacement for this, except that clear nail polish is essentially the same thing but may have extra additives. But be warned: even the smallest drop will dissolve a hole in foam pinning boards! I either have to be very careful not to drip any, or use a wooden board for wing repairs. Use a glass-headed pin to dab tiny amounts to reattach antennae or suture splits in wings, and larger droplets to reattach whole wings.
 |
| Various sizes of glassine strips |
Beginning the spreading process
Once your supplies are laid out, remove the butterfly (or moth) from the envelope. If it has dried to the point where you cannot open the wings easily, you will need to rehydrate it. Refer to my notes on this subject at the end of this page.
Inserting the insect pin
 |
| Grasp the thorax with forceps or your thumb and forefinger |
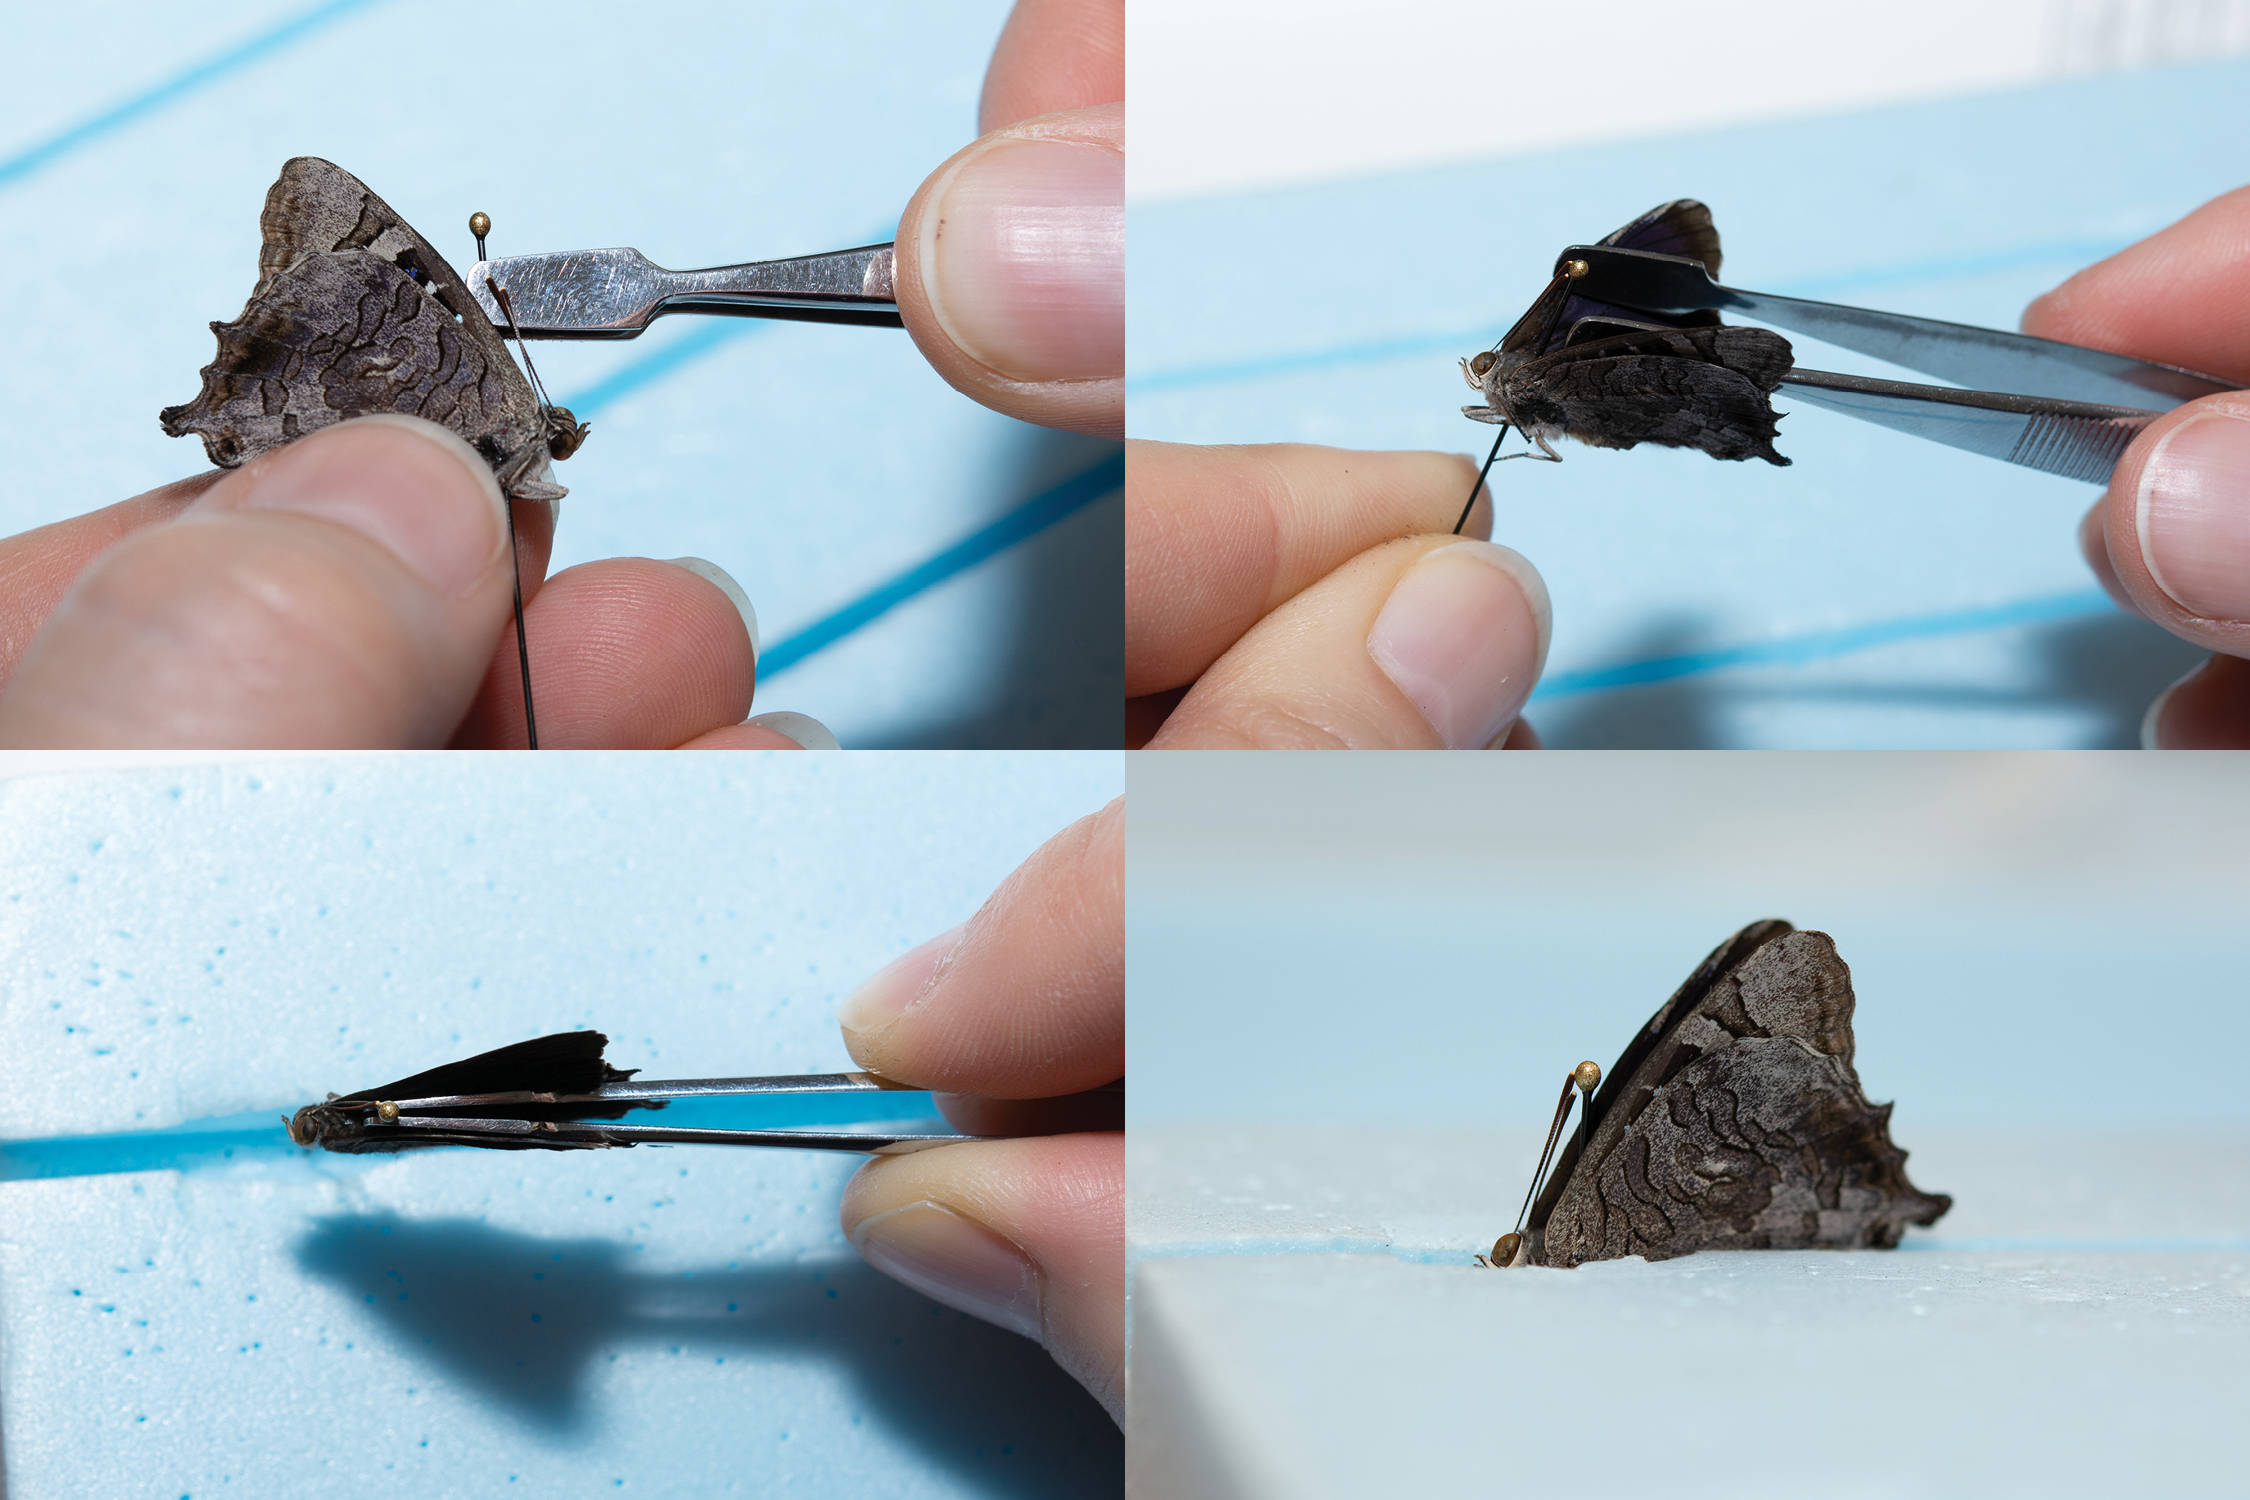
Grasp the butterfly by its thorax (middle of the body) with forceps, keeping the edge of the forceps just below the wing joint. Squeeze gently to open the wings; if the wings do not open, position the forceps slightly lower and try again. You can do this by hand also, using the forceps with your other hand to gently bend the wings open even further.
Insert the insect pin into the center of the thorax (rounded area between the wing joints), and push down until about 1/4 to 1/2 inch remains above the butterfly. Usually I grasp the butterfly with forceps or with my left hand, squeezing until the wings are open enough to see the top of the thorax, then inserting the pin with my right hand. I turn the butterfly at different angles to ensure the pin is going in straight.
 |
| If holding the butterfly by hand, you can use forceps to open the wings. |
 |
| Sliding forceps between the wings and opening them to ensure the specimen is ready to be spread (rehydrated and flexible), then inserting the insect pin. |
 |
| Positioning the insect pin and fitting a mid-size butterfly to the spreading board. |
 |
| Inserting the insect pin into a small butterfly. |
 |
| Inserting the insect pin into a large moth. Note: some excess water became apparent after squeezing the specimen while inserting the pin, so I poked the pin into a piece of paper towel, folding the paper up around the thorax and squeezing to absorb the excess water. |
Positioning the butterfly on the spreading board
Choose a groove size that comfortably fits the width of the butterfly. If the groove is too big, the butterfly will swivel around too much when you try to position the wings. If this is the case and you don't have any other groove size choices, then place the butterfly to one side of the groove, and position a pin next to the body to keep it in place. Because I always position the wings on the right side first, if I have problems with the groove size, I put the butterfly against the right side of the groove; this secures the butterfly when I pull to the right and pin down the wings on that side, and then the pinned wings (usually) keep the specimen in place when I pull to the other side to position the left-side wings.
 |
| Clockwise: center the butterfly in the groove, gently open the wings enough to allow room for your finger, press down on the pin until the base of the wings is level with the top of the board. |
Placing the Wings
I have found that the most comfortable method of positioning the wings is to have the board sideways, with the butterfly's head to the left, and to start with the right-side wings. I know, I know, pinning butterflies sideways is rather strange to most lepidopterists as I've been told! But for some weird reason it works for me, what can I say! You should try various positions to see what feels most comfortable for you. It may also depend on whether you decide to use the forceps method (how I do it, shown in the photos), or the pin method of moving the wings. The butterfly should probably be facing away from you (instead of sideways) if you are using the pin method.
Pin Method - some people prefer to use a small insect pin (such as size 00 or 000) to prick the forewing just below the major (i.e. strongest) vein near the base of the wing and pull it forward, usually piercing the wing to pin it in place. Paper strips may or may not be used, in addition to the pin, to hold the wings in place. However, no matter how small the pin is, it of course leaves a tiny hole, and occasionally the pin slips and tears the wing. Many lepidopterists are experts at this method and produce stunningly perfect specimens with no marks on the wings aside from the tiniest pin prick. Unfortunately, I am not so skilled, and only succeed to frequently rip the wings or leave larger holes. So, I use forceps.
Forceps Method - this has drawbacks as well: some scales can be rubbed off, and especially in smaller butterflies, the wings can be torn by the action of pulling them forward with the forceps. However, if you use well-polished and smooth forceps, and grasp the wing just right, pushing or pulling it forward in a slow, careful movement, you can typically place the wings with little to no scuffing.
There are two methods with forceps that I use interchangeably:
1) holding the forceps with my left hand, I grasp the leading edge of the right forewing and slowly pull it forward (to the left). This method seems to be a little more successful in placing the wing without damaging it (pulling rather than pushing), but is a little more awkward when trying to pin the paper over the wing to secure it in place, because I have to cross over the butterfly with my right hand.
2) holding the forceps with my right hand, I grasp the wing so that the tip of the forceps is just behind the leading edge of the forewing (shown in photos below). I then use my left hand to grab a strip of paper with a glass-headed pin and secure the wing in place.
In both cases, the lower edge of the forewing should be perpendicular with the body, forming a right-angle. For the rest of the instructions, see the photos below.
 |
| Showing method #2: with paper strip ready to use (upper left), hold forceps with right hand and carefully move forewing forward until the lower edge of the wing is perpendicular with the body. |
 |
| Once the forewing is in the correct position, use your left hand to pin a paper strip over the forewing (left). Move your left forefinger onto the paper strip and over the forceps to secure the wing, then gently slide the forceps away (right). |
 |
| Slide your finger down the paper strip to the lower edge of the forewing to hold it in place, then use the forceps to pull the hindwing up until there is a small gap between the forewing and the outer edge of the hindwing (left). Then slide your finger down the paper strip to the hindwing and pin down the end (right). |
 |
| For larger butterflies such as this, when the paper strip does not overlap the small space between the two wings (providing an area to place another pin, see anglewing photos below), you will need to place extra paper strips as shown to keep the wings from slipping out of place. Usually I use wider strips of paper than shown in these pictures, this is just an example showing how you can place multiple strips as needed. |
 |
| Once the right-side wings are secured, position the left-side wings in the same way. |
 |
| Securing the left-side wings |
 |
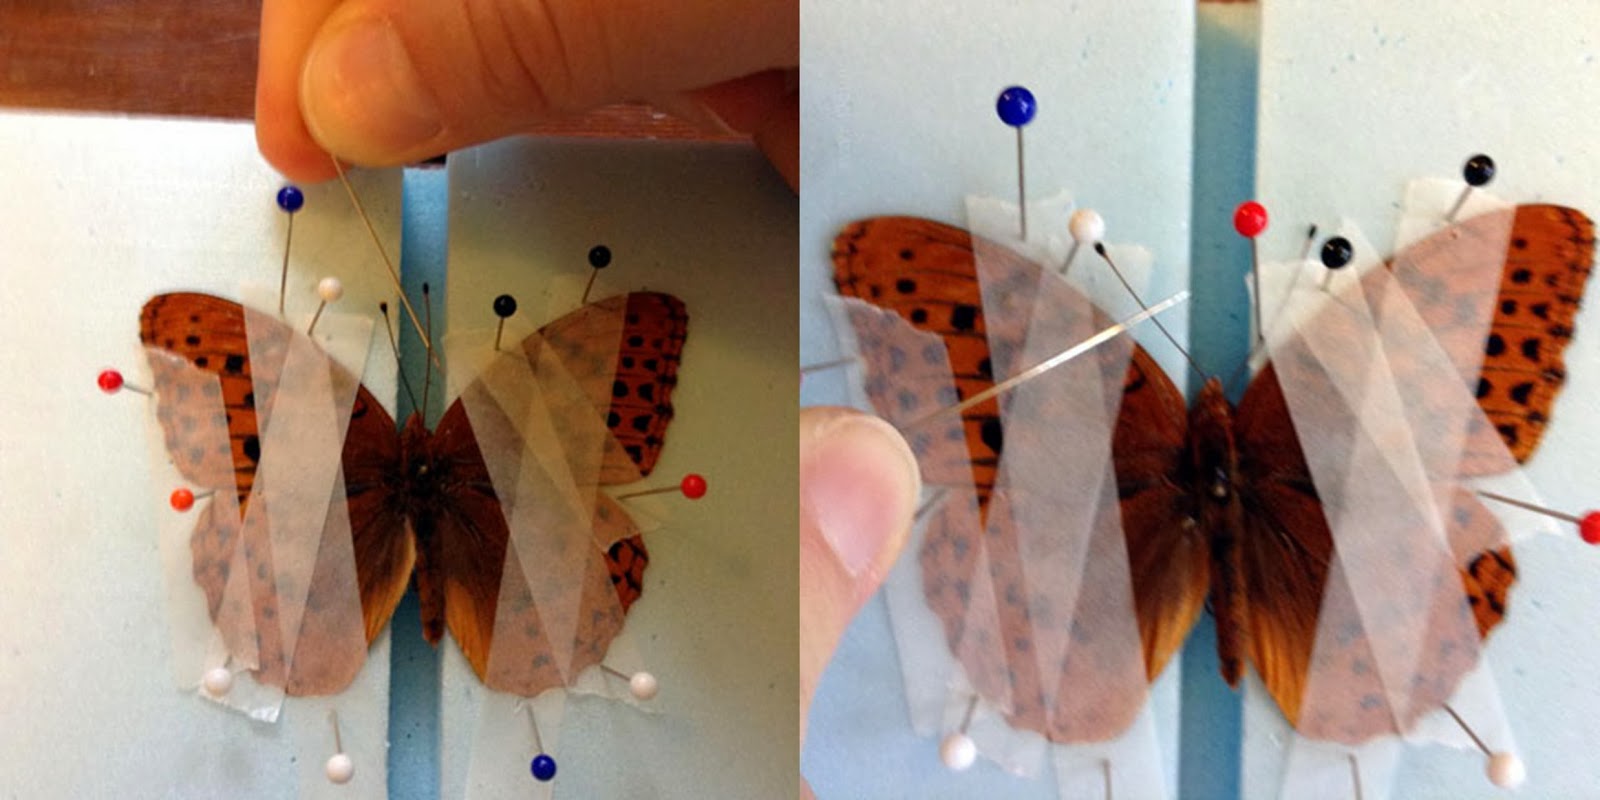
| Once the wings are in place, turn the board so the butterfly is facing away from you and make sure the wings are all lined up straight. Now position the antennae; very carefully use a glass-headed pin to slide each antenna towards the forewing, and place the pin so that the antenna does not spring back. Slide the antenna under the paper strips if possible, partly to hold it in place and partly because if the antenna is on top of the paper strip, it is easy to accidentally break it off when removing the paper strips after everything is dry. |
 |
| Finally, use two pins to prop up the abdomen so that it is level with the top of the board and to keep it from drooping as it dries. Occasionally the abdomen will bend upward as it dries (I usually see this with small blues), so I always place a third pin at an angle over the top of the abdomen to ensure it stays in place. |
 |
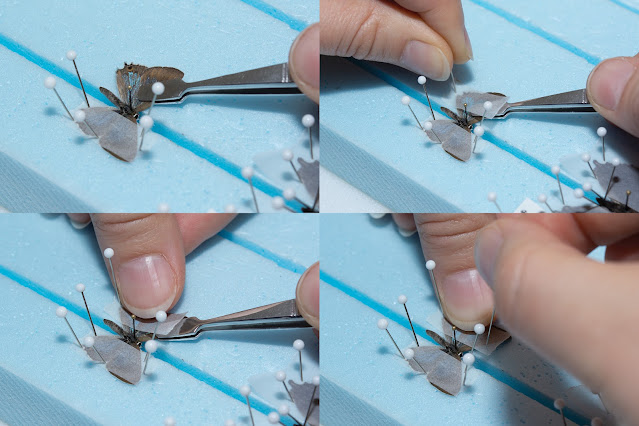
| If a wing is not lined up correctly, or slips down after you have pinned the paper in place, grasp the upper edge of the wing with forceps and gently slide it back into place, and re-adjust the pins or add additional paper strips as needed. Note in these two photos how the forewing has slipped down against the green center pin (left), so I moved the wing back, touching the top white pin (right). I then moved the green pin closer to the bottom edge of the forewing and added another paper strip (see below). |
 |
| Green Anglewing, spreading complete |
More examples shown below...
 |
| Opening the wings and setting the right side wings in place. |
 |
| Once the hindwing is in place, secure the paper with additional pins. |
 |
| Slide the left forewing forward and gently hold it in place (only enough pressure to keep it from moving, not so much that it rubs the scales into the board) while bringing the hindwing up. |
 |
| Once the hindwing is placed, lightly slide your finger down to hold both wings in place while you finish setting all the pins. Once the wings are all in place, finish by placing pins to hold the abdomen and antennae in place. |
 |
| Spreading a small hairstreak. |
 |
| On these small butterflies, sometimes the fore- and hindwing can be moved together, the paper placed over it, then only a slight adjustment if needed before setting the pins. |
 |
| Here, I was having trouble moving the forewing forward the way I did the other side, so I switched the board around and grabbed the wings from the top with my right hand, pulling them (instead of pushing) into position, using my left thumb to hold the paper in place, rolling my thumb forward as I finished setting the forewing. |
 |
| Once the wings are in place, double-check that everything is aligned properly. In this case, the left forewing was slightly lower than it should be, so I removed one of the pins, sliding the wing slightly forward with the forceps, then replacing the pin to secure it in place. Finally, I positioned the abdomen and the left antenna. The right antenna had broken off so I set it aside to be reattached later. |
 |
| Beginning to spread a Madagascar Sunset Moth. Larger butterflies and moths are usually easier to spread. |
 |
| Setting the center and end pins, then adding a second strip at a different angle to further secure the wings and cover all the tails. When adding a second strip, it may be necessary to readjust the center pin. |
 |
| Setting the left side. |
 |
| Finishing up! Placing pins at angles under the abdomen to prevent it from sagging down as it dries. For the antennae, I usually use a pin with my left hand to hold up a corner of the paper strip, while guiding the antenna with a pin in my right hand to slip it under the paper, then placing one of the pins next to the antenna to hold it in place, and repeat on the other side. |
Removing completed specimens from the board
Specimens will need anywhere from a few days to two weeks to completely dry and harden, depending on the size of the butterfly or moth. Some people place their spreading boards in an oven set at the lowest temperature to dry for a couple hours. I've tried this but it warps my foam boards a little bit so I stopped. You also have to be careful about the paper strips curling up in the oven. The oven method probably works best with wooden boards and directly-pinned wings without any paper strips.
The way I test to see if a specimen is ready to be taken off the spreading board, is to remove the pins holding up the abdomen, and use the side of one of them to gently press against the side of the abdomen. If the abdomen moves, it is not ready, but if it is hard you can remove all the paper strips and see if any of the wings start to slide out of place. If everything is stiff and stays in place, you may remove the specimen from the board, slide a label onto the pin with the specimen, and place it in a display case or storage drawer.
If a specimen is left on a board longer than a week or two, it may become infested with dermestid beetles that will easily reduce an insect collection to dust. To prevent this, keep a close eye on the specimens on the board, and if they must remain on the board for more than a week or two, once they are dry, pin them into a container with a foam bottom and place them in a freezer overnight before adding them to your collection.
Because I spread large numbers of specimens and don't have much freezer space, I invented a drying rack bug cage system: I built a rack out of 3/4" PVC pipe that fits inside one of my 24x24x32" mesh bug cages. It fits my sheets of foam spreading boards perfectly and has kept my specimens dermestid-free in the 6+ years I've been using it. I figured if the cage is made to keep bugs in, it should also keep them out! I still keep all my specimens quarantined for about a month in a separate display case after taking them off the boards, before moving them into my collection cabinets, to ensure nothing has been infested with pests.
Dealing with broken wings or antennae
Everyone will encounter this problem, no matter how careful you are. Either the wing will slip, often resulting in a chunk ripped off the edge where the forceps had a hold, or your hand will inadvertently jerk and rip an entire wing off, or a specimen may simply be too dry and fragile by the time you are ready to spread it, so that all the wings snap off when you attempt to open them. I certainly have my share of "oh no!" moments, but have learned how to repair most accidents. It is impossible to fix most tears around the edge of the wings, but some split wings are reparable, and if an entire wing is broken off, it is fairly easy to repair.
 |
| Left forewing broke off, and right hindwing split |
If a wing breaks while you are spreading a butterfly, simply pin it next to the specimen and continue to position the other wings as you normally would. Once the butterfly is dry, you can glue the wing back in place. It is best to repair specimens after they have completely dried, since they will be easier to handle and you won't run the risk of the glued parts sticking to the board. You can use pins at creative angles, or a small bit of paper to help prop and balance a wing as needed while it dries. You can leave the specimen on the pinning board for this if you want, but just be super careful that the area you glue does not come in contact with the spreading board surface.
The photo at left is of a female Anna's Blue that I had trouble with. It was in the freezer for too long and was more dried out than I thought (the other specimens were fine, but smaller butterflies dry out faster). The wings opened enough that I thought it was fine, until the last few millimeters of moving the wings into place, when one of the forewings snapped off and the last bit of the right hindwing decided not to move with the rest of the wing, resulting in a split.
 |
| One antenna is safely secured by a piece of glassine paper off to the side while the butterfly dries. I later reattached it by using a tiny dab of glue on the tip of a pin to stick to the head-end of the antenna, then gently rubbed it onto the head, using a second pin in my left hand to help guide the placement. |
Repairing a butterfly is very delicate work, but really isn't terribly difficult if you have a steady hand. I use a repair adhesive that is basically clear nail polish. Some people use watered-down craft glue. Just make sure that whatever you use is acid-free and dries clear. I dip the tip of a glass-headed pin into the glue until there is a tiny droplet on the pin, then then carefully dab it onto the part of the wing I am repairing.
Rehydrating specimens
When specimens aren't mounted within a day (if not frozen) or a few weeks (if in the freezer) of collecting them, they will need to be rehydrated in order to spread them. Typically this is done by placing them into an rehydration chamber. These contraptions have almost as many variations as there are lepidopterists! It is an air-tight container, plastic or glass, which may have layers of sawdust, plaster, or other absorbent materials, or be as simple as placing paper towels or a washcloth in the bottom. The material is then soaked with water, usually hot water, and the specimens are placed on top, usually on a piece of foam or still inside their envelopes, to prevent direct contact with the water. Another method involves floating a piece of foam on top of water, with the specimens placed on top. Many lepidopterists also place some kind of fungicidal chemical in the container to prevent mold from growing on the specimens, as these methods can take anywhere from a day to a week to fully rehydrate specimens. I've tried several variations of rehydration chambers to mixed success. Many of my specimens got too wet, damaging the wings, or would only partially soften even if left in for days, and my whites and sulphurs almost always ended with blue-green veins, something which commonly happens to the Pieridae family when they get even a little bit wet.
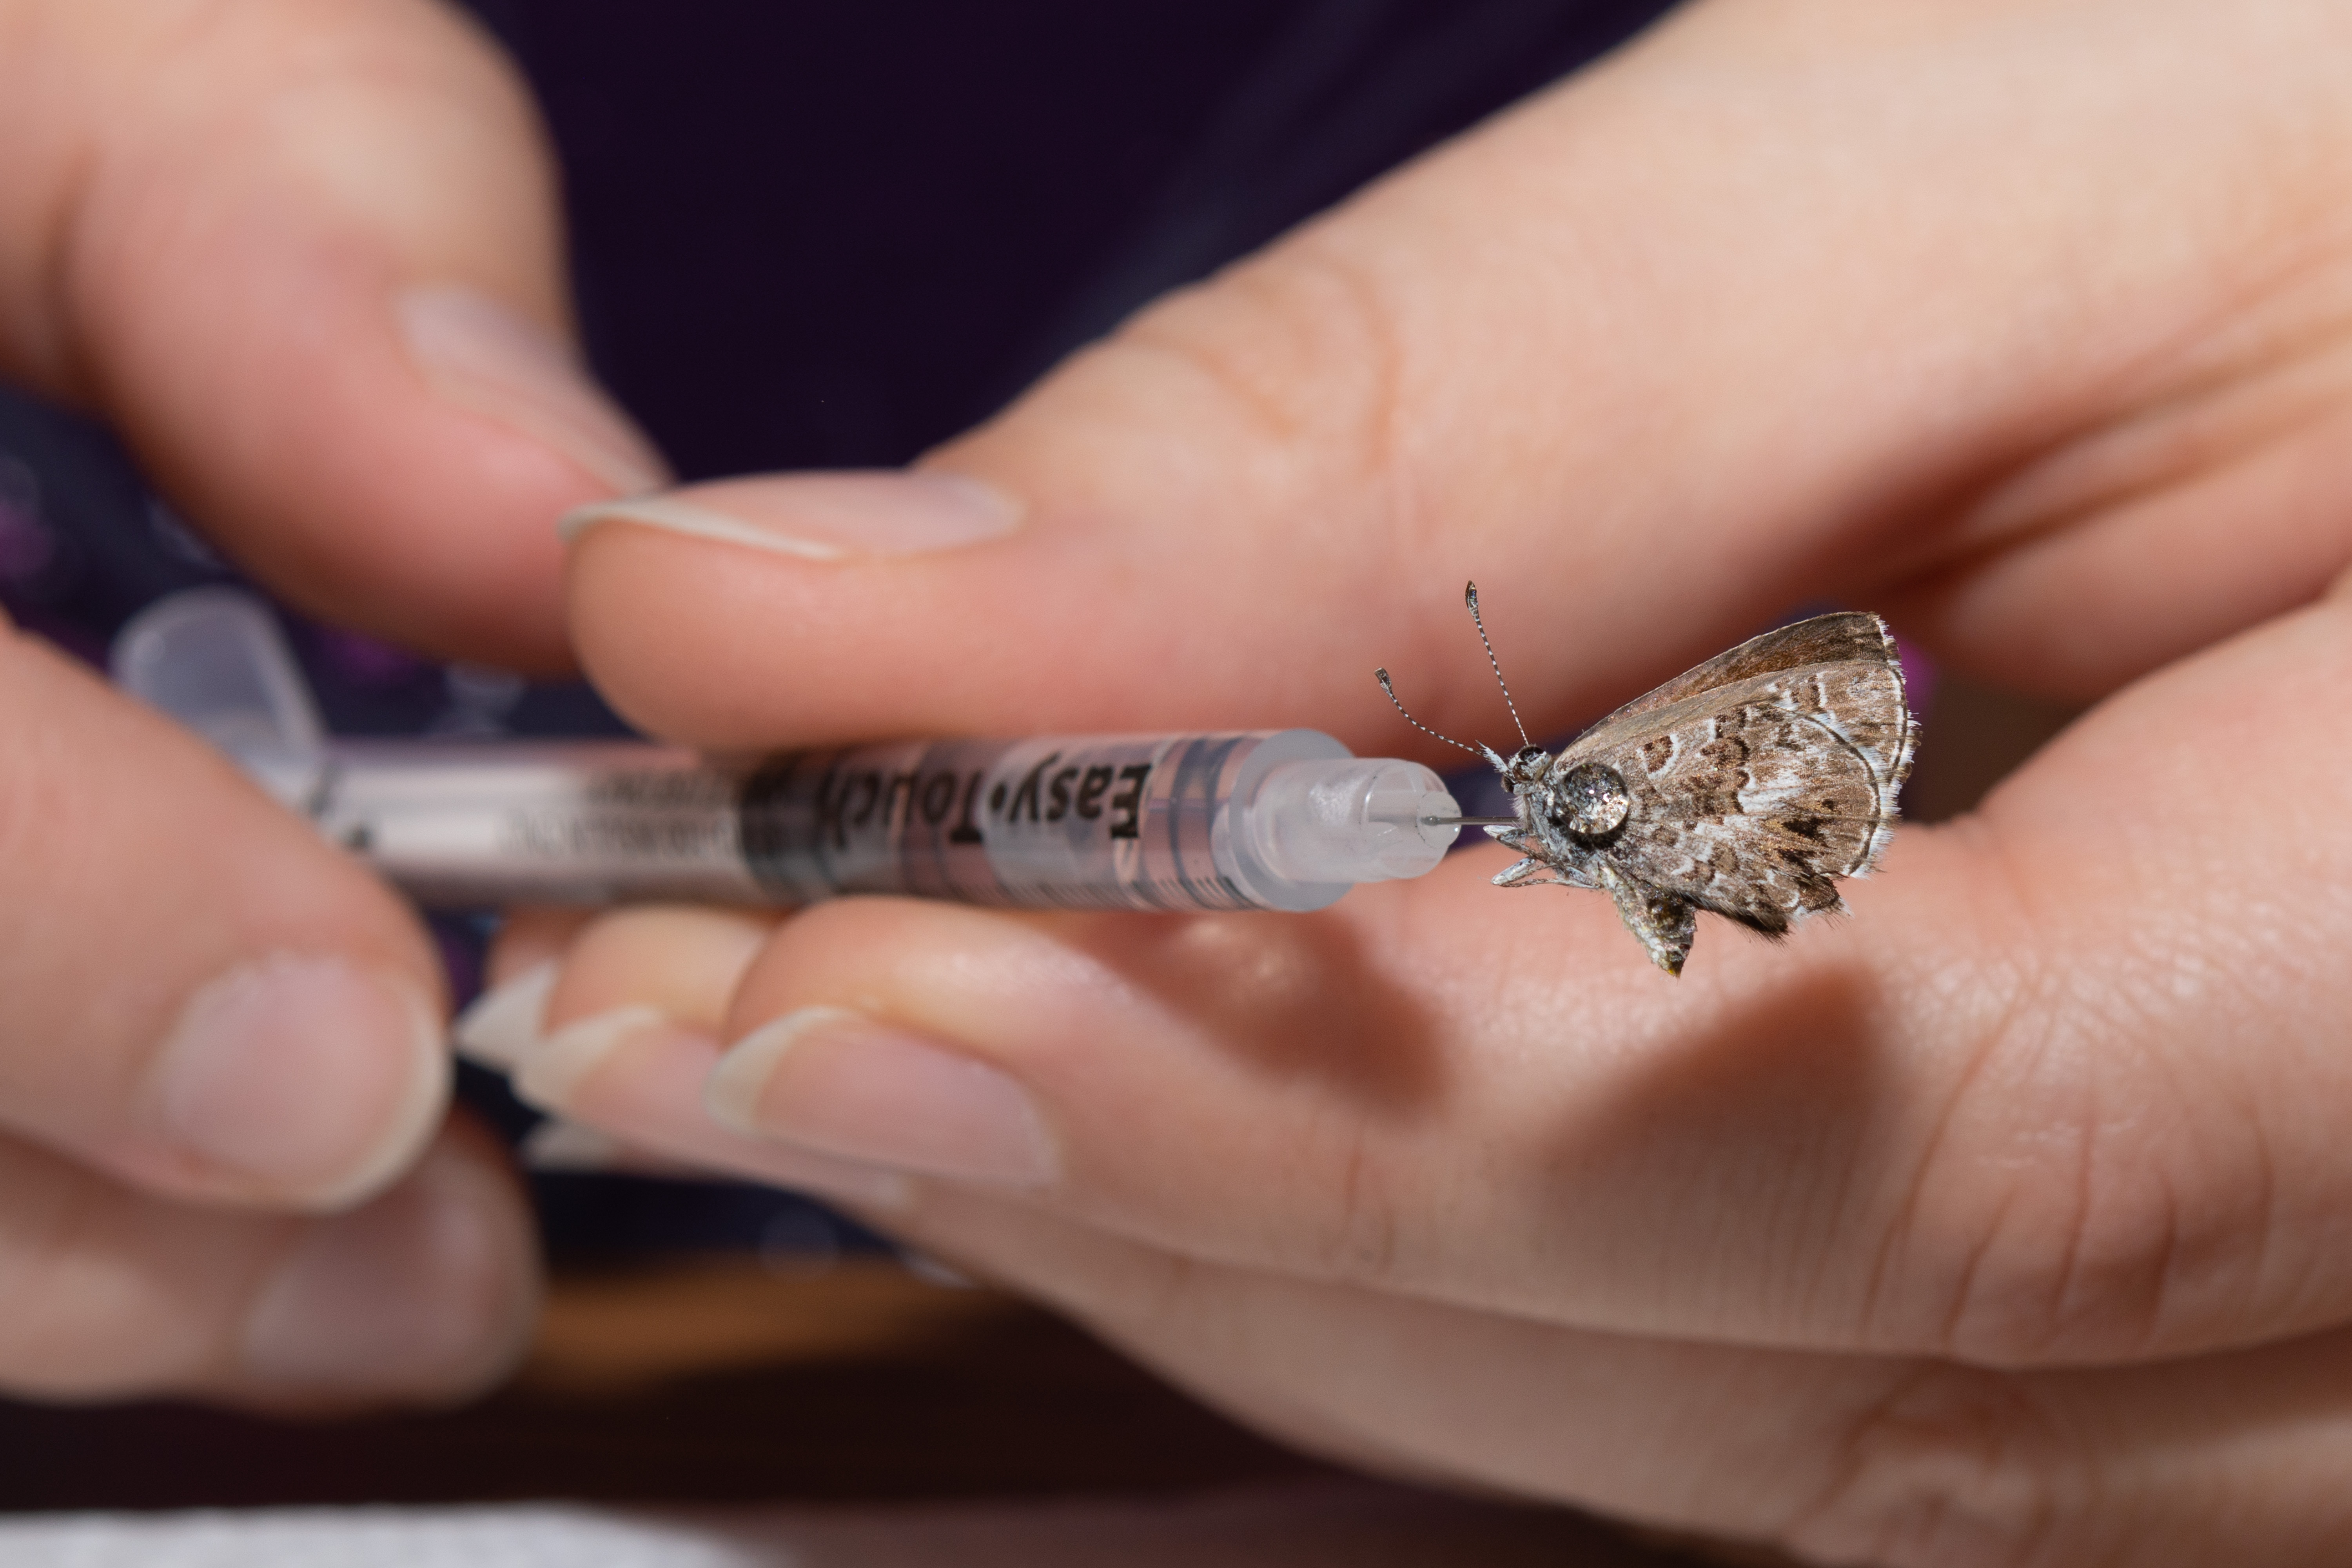
Eventually I was taught the "injection method" by a fellow collector and have come to prefer it for its simplicity and immediate effect. If you are squeamish, this probably isn't for you (I get some very strange looks from friends when they ask me how I can make butterflies flexible again after they've dried out!), it involves injecting boiling hot water directly into the thorax of a specimen using a very small gauge syringe (i.e. insulin needle). Insulin needles can be easily purchased in packs of 20, 50 or 100 on Amazon. Make sure to get the smallest gauge you can find, usually 30 or 31, 32 is the tiniest but that’s usually only on the “pin” style of diabetic needles and not in a syringe, so pay attention to the pictures and description.
The needles can be reused many times, especially for larger butterflies, so a 50 or 100 pack will probably last most of your life. Tiny specimens, like delicate blues, will require a super sharp needle, so save the new/newer ones for those, and use the older/duller ones for the larger butterflies.
You will need a couple folded paper towels placed either on a foam block (I use the 4x7" pinning blocks BioQuip used to sell), or any hard surface. The paper towel will absorb any water that squirts out of the specimen and also helps keep it from sliding around. Lay out a few specimens on the paper towel as you get things ready. The water must be very hot for the best effect. If you're only doing a couple specimens, then simply boiling a kettle and filling your syringe from a cup of the hot water is sufficient. However, if you will be pinning several specimens over a period of a few hours, I've found it very handy to have a small hot plate on my working area so that I can keep a small pot of water simmering (keep a lid on it so the steam doesn't affect your work area), then whenever I'm ready to inject some specimens I can turn it up to quickly get it boiling again, and fill the syringe directly from the pot. This is also handy when spreading a bunch of specimens that don't need to be relaxed, but you occasionally run into one in the bunch that has started to dry too much: you don't have to set it aside to be rehydrated and spread later, you can just immediately inject it and keep going.
To inject a specimen, draw a bit of hot water into the syringe, then carefully inject into the thorax of a specimen that is laying on your paper towel. For most cases, you will be able to easily inject the specimen while it's on its side, injecting the needle at an angle into the thorax. In some cases the antennae might be at an angle that would break if very much pressure is given to the specimen on its side, so you may need to hold it with forceps or your fingers to get the right angle and pressure. It usually doesn't take much, and be careful not to push the needle all the way through. When you start injecting the water, if it immediately squirts out the other side, you know you went too far (although some beading will usually exude in various directions no matter what). In that case, pull the needle back slightly and angle it more, either towards the abdomen or head, then slowly inject again. Most specimens need very little water, only inject just enough to get the wings moving. Once the head and antennae start to relax and move slightly while injecting the hot water, or a fair-sized bead of water has started squeezing out, you can stop. Once you think you've injected enough hot water, lay the specimen back down on the paper towel and gently apply pressure to the thorax with a small piece of paper towel (using your fingers or forceps), this does two things: it helps remove any excess water, and it helps force the water into the tissues to thoroughly rehydrate the specimen.
Occasionally a bead of water will exude from the rear of the thorax up between the folded wings during the injection. Be very vigilant for this, as it will cause water damage to the wings if not removed quickly. Keep a small piece of paper towel handy, grasp it with forceps and carefully slide it between the wings to wick up the beaded water. Also watch for more water coming up between the wings when you press the thorax, either when dabbing extra moisture mentioned earlier, or when squeezing with forceps to open the wings during spreading.
If a specimen is being particularly difficult, I’ll briefly hold it over the steam from my simmering pot to get it just soft enough to allow easy poking, or to straiten out a bend in an antenna, but I only do that in the most difficult cases because the steam quickly beads up on the forceps and wings and can ruin the specimen.
If your specimens aren't flexible enough to spread in under a minute, then you either need hotter water (remember it cools quickly in the syringe, so draw up fresh hot water for every 3-4 specimens), or you need to inject more water. For large specimens, you may need to inject small amounts in a couple places, angling in different directions in the thorax, then let it sit for a few minutes to allow time for the water to fully absorb.
I've used this hot water injection method on specimens up to 50 years old with great results. I haven't tried it on anything older yet, but expect it would work just as well. Older specimens usually need to sit for a bit longer after injection, but otherwise the method is the same.
 |
| Injecting a dry butterfly specimen with hot water to rehydrate it for spreading. The needle is angled to the rear, but water is starting to exude from around the wings, indicating a sufficient amount has been injected. |
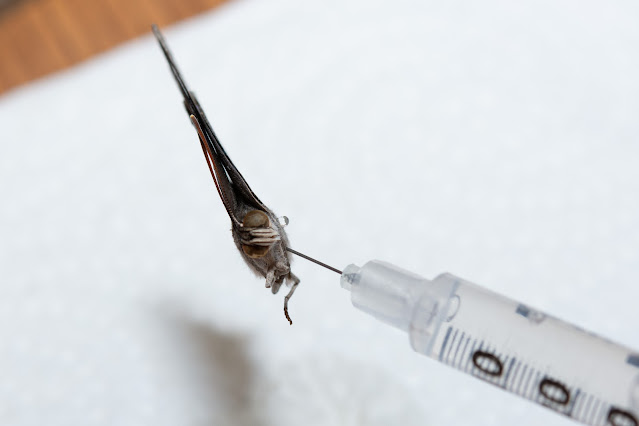 |
| Illustrating the angle I typically aim for when injecting specimens to rehydrate them. |
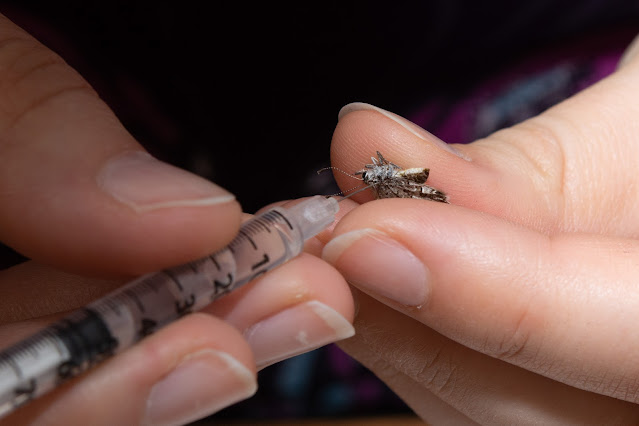
 |
| Once the butterfly has been injected, carefully open the wings with forceps. |
 |
| Check for any excess water between the wings, while also checking that the wings are softened and pliable for spreading. |
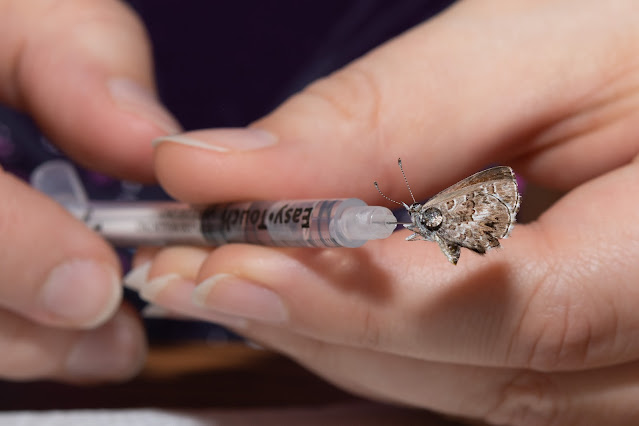
 |
| If the wings are still a little stiff, inject a tiny amount of hot water at a different angle than the first attempt and repeat checking the wings. |
 |
| Rehydrating tiny butterflies is more difficult. If an antenna pops off, save it to be reattached later. |
 |
| Some water has pooled up between the wings of this small hairstreak and must be removed to prevent damage to the wings. |
 |
| Grasping a piece of paper towel with forceps, carefully slide it between the wings to absorb the water droplet. |
 |
| If you have difficulty getting the needle to insert in a small specimen against the paper towel, it may be necessary to hold it to apply pressure from a different angle against your finger. |
 |
| Water will almost always bead up on either side of the specimen, this is okay and lets you know the water is working through the thorax. If the water streams out quickly, the needle is probably inserted too far across the thorax and is spewing water out the other side without any going into the specimen. Back the needle out slightly and continue to inject. |
 |
| Large specimens are very easy to inject, but you may need to inject small amounts from a few angles to ensure the hot water thoroughly works through the thorax to rehydrate the muscles. |
 |
| Check the pliability of the wings, gently squeezing the thorax if needed to help soften things up. |
 |
| Inject a bit more hot water from the opposite side and then let the specimen sit for a few minutes to finish rehydrating before pinning it. |


This is truly an excellent contribution to the literature on spreading, collecting, mounting, hydrating, and repairing Lepidoptera. I had really lost heart, completely discouraged after my attempts, but this complete posting on all of the problems I have run into with solutions and encouragement not to despair or give up has reanimated my commitment to serve my desire Ito illustrate butterflies and moths accurately. There are so many in depth useful tips beyond what I have seen before and the kindness to share mistakes and efforts to salvage mistakes, that make the true leader. Thank you, Caitlin LaBar, Northwestbutterflies Blogspot. I will let all of my Nature Journal students know about you.
ReplyDeleteThanks for this post. I've been trying to improve my lep collection and this has been a fantastic resource.
ReplyDeleteThank you very much for the information and photos. I'm sure it took a lot of time. I've not caught a butterfly yet but am looking forward to preserving some. My Granddaughters are excited about making pictures with butterflies and flowers. They will be beautiful.
ReplyDeleteWhat do you recommend for reattaching antennas? Thanks!
ReplyDeleteSame glue as repairing the wings, but can be quite difficult. I usually lick the end of a pin and stick the antenna to it, then place in the right spot on the head (after dabbing a drop of glue onto the head first).
Delete